жңҖж–°гҒ®иЁҳдәӢ
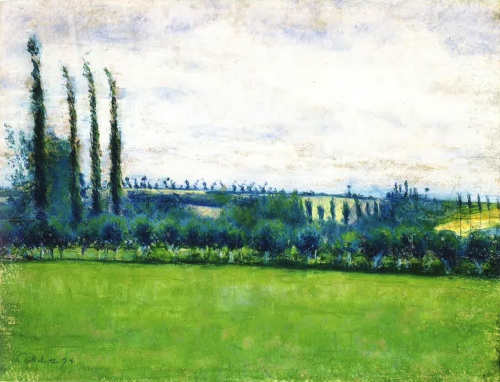 гғ–гғӘгғӮгӮ№гғҲгғізҫҺиЎ“йӨЁгҒҢгӮ«гӮӨгғҰгғңгғғгғҲгҒ®гҖҠгӮӨгӮЁгғјгғ«гҒ®е№іеҺҹгҖӢгӮ’ж–°жүҖи”өпјҶеұ•зӨә
гғ©гғігғҖгғ иЎЁзӨә
 гғүгӮ¬пҪңйўЁе‘ӮгҒӢгӮүдёҠгҒҢгӮӢеҘі
- 2015е№ҙ2жңҲ (2)
- 2014е№ҙ12жңҲ (4)
- 2014е№ҙ11жңҲ (2)
- 2014е№ҙ5жңҲ (2)
- 2014е№ҙ3жңҲ (1)
- 2013е№ҙ12жңҲ (3)
- 2013е№ҙ11жңҲ (1)
- 2013е№ҙ10жңҲ (1)
- 2013е№ҙ8жңҲ (2)
- 2013е№ҙ3жңҲ (3)
- 2013е№ҙ2жңҲ (2)
- 2013е№ҙ1жңҲ (3)
- 2012е№ҙ9жңҲ (3)
- 2012е№ҙ4жңҲ (1)
- 2012е№ҙ2жңҲ (2)
- 2011е№ҙ10жңҲ (4)
- 2011е№ҙ9жңҲ (5)
- 2011е№ҙ8жңҲ (5)
- 2011е№ҙ7жңҲ (8)
- 2011е№ҙ4жңҲ (2)
- 2011е№ҙ2жңҲ (1)
- 2010е№ҙ12жңҲ (2)
- 2010е№ҙ10жңҲ (3)
- 2010е№ҙ9жңҲ (4)
- 2010е№ҙ8жңҲ (2)
- 2010е№ҙ7жңҲ (5)
- 2010е№ҙ6жңҲ (6)
- 2009е№ҙ11жңҲ (1)
- 2009е№ҙ6жңҲ (30)
- 2009е№ҙ3жңҲ (1)
- 2009е№ҙ2жңҲ (4)
- 2009е№ҙ1жңҲ (6)
- 2008е№ҙ12жңҲ (6)
- 2008е№ҙ11жңҲ (6)
- 2008е№ҙ10жңҲ (12)
- 2008е№ҙ9жңҲ (1)
- 2008е№ҙ7жңҲ (1)
- 2008е№ҙ6жңҲ (11)
- 2008е№ҙ5жңҲ (3)
- 2008е№ҙ3жңҲ (9)
- 2008е№ҙ2жңҲ (2)
- 2008е№ҙ1жңҲ (8)
- 2007е№ҙ12жңҲ (1)
- 2007е№ҙ11жңҲ (4)
- 2007е№ҙ9жңҲ (9)

жҲёеӨ–гҒӢгӮүйҒӢгӮ“гҒ иЈ…зҪ®гҒ®и·ЎгҒҢгҒӨгҒ„гҒҰгҒ„гӮӢдҪңе“Ғ гҖҢгғҲгӮҘгғ«гғјгғҙгӮЈгғ«гҒ®еәӯгҖҚ
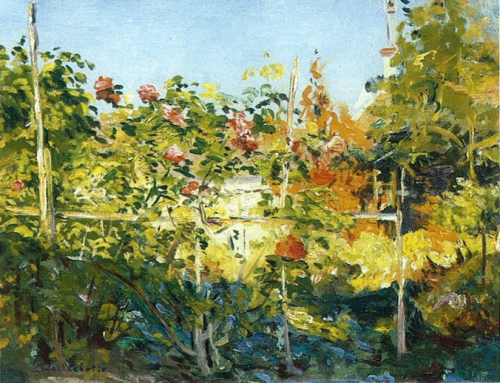
1882 е№ҙ гӮ«гғігғҙгӮЎгӮ№гҒ«жІ№еҪ© 27.5Г—35.5cm
дҪңе“ҒжҰӮиҰҒгҒҜгҒ“гҒЎгӮү
гҒ“гҒЎгӮүгҒҜж–ңе…үгҒ«гҒӮгҒҰгҒҹгҒ“гҒ®дҪңе“ҒгҖӮ
зөөгҒ®е…·гҒ®зӣӣгӮҠдёҠгҒҢгӮҠгҒҢгӮҲгӮҠгҒҜгҒЈгҒҚгӮҠеҲҶгҒӢгӮҠгҒҫгҒҷгҖӮ
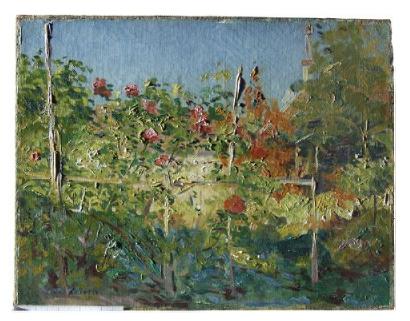
гҒқгҒ—гҒҰгҖҒгҒқгҒ®е·ҰдёҠгҒ®йғЁеҲҶгӮ’гӮҜгғӯгғјгӮәгӮўгғғгғ—гҒ—гҒҹгҒ®гҒҢгҒ“гҒЎгӮүгҖӮ

гҒҠпјҒжҳҺгӮүгҒӢгҒ«гҒ“гҒ“гҒ гҒ‘йҒ•гҒЈгҒҰгҒ„гҒҫгҒҷгҖӮ
гҒқгҒ—гҒҰзҙ«еӨ–з·ҡгҒ«еҪ“гҒҰгҒҰиӘҝжҹ»гҒ—гҒҹгӮӮгҒ®гҒҢгҒ“гҒЎгӮүгҖӮ
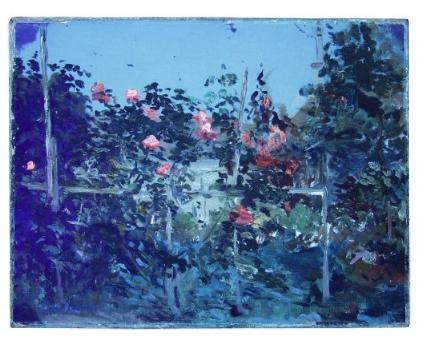
еӣӣйҡ…гҒ«зөөгҒ®е…·гӮ’еҠ гҒҲгҒҹгҒӮгҒЁгҒҢж®ӢгҒЈгҒҰгҒ„гҒҫгҒҷгҖӮ
гҒ“гҒ“гҒ«гӮ№гғҡгғјгӮөгғјгӮ’еҲәгҒ—гҒҰгҖҒжҲёеӨ–гҒӢгӮүгҒ“гҒ®дҪңе“ҒгӮ’йҒӢгӮ“гҒ гҒ®гҒ§гҒҷгҒӯгҖңгҖӮ
————————————————-
гҖҗеӣійҢІи§ЈиӘ¬гҖ‘
гҖҢе…үгӮ’жҸҸгҒҸеҚ°иұЎжҙҫеұ•вҲ’зҫҺиЎ“йӨЁгҒҢи§ЈгҒ„гҒҹи¬ҺвҲ’гҖҚеұ•иҰ§дјҡеӣійҢІP84гӮҲгӮҠ
————————————————-
д»ҘдёӢгҒҜгҖҢе…¬ејҸгҒ®иӘҝжҹ»е ұе‘ҠгӮөгӮӨгғҲгҖҚгӮ’зҝ»иЁігҒ—гҒҹгӮӮгҒ®гҒ§гҒҷгҖӮ
и©ізҙ°еӣігҒҜгҒ“гҒ“гҒ«ијүгҒӣгҒҰгҒ„гҒҫгҒӣгӮ“гҒ®гҒ§гғӘгғігӮҜе…ҲгӮ’гҒ”зўәиӘҚгҒҸгҒ гҒ•гҒ„гҖӮ
пјҲй–“йҒ•гҒ„гҒҢгҒӮгӮҠгҒҫгҒ—гҒҹгӮүгҒ©гҒҶгҒһгҒ”жҢҮж‘ҳгҒҸгҒ гҒ•гҒ„mmпјү
————————————————-
гҒ“гҒ®е°ҸгҒ•гҒӘдҪңе“ҒгҒ§гҒҜгҖҒгӮ«гӮӨгғҰгғңгғғгғҲгҒҜжЁҷжә–зҡ„гҒӘF5гҒЁгҒ„гҒҶгӮөгӮӨгӮәгҒ®гӮӯгғЈгғігғҗгӮ№гӮ’дҪҝз”ЁгҒ—гҒҰгҒ„гӮӢгҖӮгҒҷгҒ§гҒ«дёӢеЎ—гӮҠгҒҢгҒ•гӮҢгҒҰеЈІгӮүгӮҢгҒҰгҒ„гӮӢгҒ“гҒ®гӮөгӮӨгӮәгҒ®гӮӯгғЈгғігғҗгӮ№гӮ’гӮ«гӮӨгғҰгғңгғғгғҲгҒҜгӮҲгҒҸдҪҝз”ЁгҒ—гҒҹгҖӮпјҲеҸӮз…§пјҡгҖҢгғҺгғ«гғһгғійўЁгҒ®з”°иҲҺгҒ®е®¶гҖҚгҖҢгӮёгғ«гғ»гғ–гғ©гӮ№зҙҷгӮ’жҢҒгҒӨз”· гҖҚгҖҢгӮӨгӮЁгғјгғ«гҒ®еәӯең’гҒ®и§’гҖҚгҖҢгғһгғ«гғӘгғјгҒ®зөҰж°ҙиЁӯеӮҷгҖҚгҖҢжңәдёҠгҒ®гҒ«гӮ“гҒ«гҒҸгҒ®гҒӢгҒ‘гӮүгҒЁгғҠгӮӨгғ•гҖҚпјү
画家гҒҜзҫҺгҒ—гҒ„еәӯгҒ®йўЁжҷҜгӮ’гҖҒзҝ’дҪңгӮ’жҸҸгҒӢгҒҡгҒ«жҸҸгҒ„гҒҹгӮҲгҒҶгҒ«иҰӢгҒҲгӮӢгҖӮ
гҒ„гҒҸгҒӨгӮӮгҒ®зөөгҒ®е…·гҒ®зӮ№гҒЁзҹӯгҒ„жіўеҪўгҒ®з·ҡгҒ§з”»йқўгӮ’еҹӢгӮҒе°ҪгҒҸгҒҷеүҚгҒ«гҖҒгҒ„гҒҸгҒӨгҒӢгҒ®е№іеЎ—гӮҠгҒЁгҒЁдёӢеЎ—гӮҠгӮ’еәғгҒҸеЎ—гӮӢгҒ“гҒЁгҒҢгӮ«гӮӨгғҰгғңгғғгғҲгҒ®е”ҜдёҖгҒ®гҖҢж–№йҮқгҖҚгҒ гҒЈгҒҹгҖӮ
гӮ«гӮӨгғҰгғңгғғгғҲгҒҜгҒ“гҒ®гғ—гғӯгӮ»гӮ№гӮ’еӢўгҒ„гӮҲгҒҸгҒҠгҒ“гҒӘгҒЈгҒҹгҖӮ
жңҖеҲқгҒ®дёӢеЎ—гӮҠгҒҢд№ҫгҒ„гҒҹеҫҢгҖҒеҪјгҒҜдё»гҒ«гӮҰгӮ§гғғгғҲгӮӨгғігӮҰгӮ§гғғгғҲгҒ®з”»жі•гҒ§жҸҸгҒ„гҒҹгҖӮгҒқгӮҢгҒ«гӮҲгҒЈгҒҰгҒ“гҒ®дҪңе“ҒгҒҢе°‘гҒӘгҒ„е·ҘзЁӢгҒ§гҒ§жҸҸгҒӢгӮҢгҒҹгҒЁгҒ„гҒҶгҒ“гҒЁгӮ’д»®е®ҡгҒҷгӮӢгҒ“гҒЁгҒҢеҮәжқҘгӮӢгҖӮпјҲи©ізҙ°еӣі10,11пјү
зҙ ж—©гҒҸгҖҒгғҖгӮӨгғ¬гӮҜгғҲгҒ«жҸҸгҒҸгҒ“гҒЁгҒҜгҒ“гҒ®дҪңе“ҒгҒҢгғўгғҒгғјгғ•гҒ®еүҚгҒ§жҸҸгҒӢгӮҢгҒҹгҒ“гҒЁгӮ’зӨәгҒ—гҒҰгҒ„гӮӢгҖӮ
зўәгҒӢгҒ«гҖҒжҲёеӨ–гҒ§жҸҸгҒӢгӮҢгӮӢзөөз”»гҒ®е…ёеһӢзҡ„гҒӘиЈңеҠ©е…·гҒ®и·ЎгӮ’з”»йқўдёҠгҒ«зҷәиҰӢгҒ—гҒҹгҖӮ
гҒҷгҒ№гҒҰгҒ®еӣӣйҡ…гҒ«гҒӮгӮӢз©ҙгҒЁеҶҶеҪўгҒ®гҒҸгҒјгҒҝгҒҢгҒӮгӮӢгҖӮгҒ“гӮҢгҒҜгӮ№гғҡгғјгӮөгғјпјҲз©әй–“гӮ’дҪңгӮӢгҒҹгӮҒгҒ®еҷЁе…·пјүгҒ®дҪҝз”ЁгҒ«гӮҲгҒЈгҒҰгҒ§гҒҚгҒҹгӮӮгҒ®гҒ гҖӮпјҲ[Guillaumin, WRM Dep. FC 749; Bomford 1990, p. 178]еҸӮз…§пјүпјҲи©ізҙ°еӣі12пјүгҖӮ
гҒқгҒ®еҷЁе…·гҒҜгҖҒйҮ‘еұһгҒ®йҮҳгҒҢдёЎеӨ–еҒҙгҒ«гҒӨгҒ„гҒҰгҒ„гӮӢе°ҸгҒ•гҒӘдёёгҒ„жңЁгҒ§еҮәжқҘгҒҹгӮӮгҒ®гҒ гҖӮ2гҒӨжҸҸгҒ„гҒҹгҒ°гҒӢгӮҠгҒ®зөөгҒ«гҖҒгҒ“гӮҢгӮүгҒ®гӮ№гғҡгғјгӮөгғјгӮ’и§’гҒ«еҲәгҒ—гҖҒеҲҘгҖ…гҒ«йӣўгҒ—гҒӘгҒҢгӮүеҗ‘гҒӢгҒ„еҗҲгӮҸгҒӣгҒ«гҒ—гҒҰе®үе…ЁгҒ«йҒӢгҒ¶гҒ“гҒЁгҒҢгҒ§гҒҚгҒҹгҖӮпјҲ [Winsor & Newton 1896, p. 117]еҸӮз…§пјү
гҒ“гҒ®дҪңе“ҒгҒ®е ҙеҗҲгҒҜгҖҒе……еЎ«гҒЁгғ¬гӮҝгғғгғҒгҒ«гӮҲгҒЈгҒҰгҒ“гӮҢгӮүгҒ®з—•и·ЎгҒҢйҡ гҒ•гӮҢгҒҰгҒ„гӮӢгҒҹгӮҒгҖҒд»Ҡж—ҘгҒ§гҒҜгҒ“гӮҢгӮүгӮ’жҺўгҒ•гҒӘгҒ‘гӮҢгҒ°гӮҸгҒӢгӮүгҒӘгҒ„гҖӮ
и©ізҙ°еӣі2пјҡF5гҒ®гӮ№гӮҝгғігғ—гҒҢжҠјгҒ•гӮҢгҒҰгҒ„гӮӢиЈҸйқўгҖӮ
и©ізҙ°еӣі3пјҡж–ңе…үгӮ’гҒӮгҒҰгҒҹж§ҳеӯҗ
и©ізҙ°еӣі4пјҡйҖҸйҒҺе…үз·ҡеҶҷзңҹ
и©ізҙ°еӣі5пјҡзҙ«еӨ–з·ҡеҶҷзңҹ
и©ізҙ°еӣі6пјҡXз·ҡеҶҷзңҹ
и©ізҙ°еӣі7пјҡйЎ•еҫ®йҸЎгҒ§иҰӢгӮӢгӮөгӮӨгғіи©ізҙ°пјҲ1зӣ®зӣӣ=1mmпјү
и©ізҙ°еӣі8пјҡдёӯеӨ®дёӢйғЁгҖӮзөөгҒ®е…·гҒ®еұӨгҒҢз·‘иүІгҒ®дёҖйғЁгҒӢгҒҷгӮҢгҒҹдёӢеЎ—гӮҠгҒЁж··еңЁгҒ—гҒҰгҒ„гӮӢгҖӮ
и©ізҙ°еӣі9пјҡйЎ•еҫ®йҸЎгҒ§иҰӢгӮӢгҖҒдёӢең°гҒЁж”ҜжҹұгӮ’жҸҸгҒ„гҒҹзҙ«иүІгҒ®дёӢжҸҸгҒҚгҖӮпјҲ1зӣ®зӣӣ=1mmпјү
и©ізҙ°еӣі10пјҡйЎ•еҫ®йҸЎгҒ§иҰӢгӮӢгӮҰгӮ§гғғгғҲгғ»гӮӨгғігғ»гӮҰгӮ§гғғгғҲгҒ®ж§ҳеӯҗпјҲ1зӣ®зӣӣ=1mmпјү
и©ізҙ°еӣі11пјҡйЎ•еҫ®йҸЎгҒ§иҰӢгӮӢгғҗгғ©гҒ®иҠұгҒігӮүйғЁеҲҶгҒ®иөӨгҒ„зөөгҒ®е…·гҒ®еӣәгҒҫгӮҠгҖӮпјҲ1зӣ®зӣӣ=1mmпјү
и©ізҙ°еӣі12пјҡйЎ•еҫ®йҸЎгҒ§иҰӢгӮӢдҪңе“Ғе·ҰдёӢйҡ…гҒ®и©ізҙ°гҖӮгӮ№гғҡгғјгӮөгғјпјҲдёҠпјүгӮ’зөөгҒ®е…·гҒҢд№ҫгҒ„гҒҰгҒ„гҒӘгҒ„гҒҶгҒЎе·®гҒ—гҒҹгҒҹгӮҒгҖҒеҶҶеҪўгҒ®и·ЎгҒҢгҒӨгҒ„гҒҹгҒ®гҒ гӮҚгҒҶгҖӮпјҲ1зӣ®зӣӣ=1mmпјү
For this small painting, Caillebotte used a standard F5 size canvas, a format he often employed, commercially preprimed in white [Berhaut 1994, no. 163, no. 152, no. 38, no. 30, no. 556 ff]. The artist painted the idyllic garden scenery apparently without any preliminary drawing. His only orientation was a few brush-strokes and broader areas of underpainting, before he filled in the picture with countless dabs of paint and short wavy lines. Caillebotte went about this process briskly. After the first underpainting had dried, he worked predominantly wet-in-wet, so that we can assume the picture was completed in just a few sessions (figs. 10, 11). The quick work and the directness of the depiction suggest that the picture was painted in the presence of the motif. Indeed we find on the picture traces of a typical aid to plein air painting. Thus in all four corners there are pinholes and circular depressions, which could be due to the use of spacers [cf. Guillaumin, WRM Dep. FC 749; Bomford 1990, p. 178] (fig. 12). These were small round blocks of wood with metal spikes on both sides: two freshly painted pictures could be safely transported face-to-face when these spacers were stuck into the corners of each to keep them apart [cf. Winsor & Newton 1896, p. 117]. In the present case, attempts were later made to hide these traces by filling and retouching, so that today one has to look for them.
Fig. 2пјҡVerso with standard-format stamp 5 F
Fig. 3пјҡRaking light
Fig. 4пјҡTransmitted light
Fig. 5пјҡUV fluorescence
Fig. 6пјҡX-ray
Fig. 7пјҡDetail, signature, microscopic photograph, (M = 1 mm)
Fig. 8пјҡDetail, bottom centre, where the paint layer is flanking the green, partly abraded underpainting is visible
Fig. 9пјҡAreas where the ground is visible, and violet underpainting line to mark out the espalier, microscopic photograph (M = 1 mm)
Fig. 10пјҡWet-in-wet applications, microscopic photograph (M = 1 mm)
Fig. 11пјҡRed lake in the area of the rose petals, microscopic photograph (M = 1 mm)
Fig. 12пјҡDetail, bottom left-hand corner of picture, circular impressions in the fresh paint probably result from the use of commercial spacers (see above), microscopic photograph (M = 1 mm)
Comment
No comments yet.
